Basic Techniques
Now that you’ve selected your fabric and understand how it will work with your pattern, it’s time to learn the fundamental techniques that will help you bring your project to life. These basic skills form the foundation of all sewing projects, from simple repairs to complex garments.
We’ll cover cutting your fabric, using your sewing machine and some basic stitches you need to know. Along with some other information that seasoned sewists take for granted but beginners have yet to learn.
Pattern & Fabric Preparation and Cutting
Proper preparation is crucial for successful sewing. This starts with understanding how to handle your pattern and fabric correctly.
Your fabric should be ready to cut. This could mean pre-washing it or pre-treating it. And you want it to be free of wrinkles. Wrinkly fabric now while you’re cutting it out could mean inaccurate pieces after they are cut.
And your pattern should be ready to be used. The tissue pieces should be separated and wrinkle-free (you can iron your pattern with a dry iron on medium to low heat, but test a corner before plunking your iron on the paper). I prefer to cut my patterns on the cut line before cutting fabric. Then, when I cut my fabric, I’m not cutting both fabric and pattern at the same time. This reduces the movement of the pattern over the fabric. However, if you are using a multi-size pattern and want to preserve the sizes that will be cut off, I recommend tracing the pattern onto some other paper and keeping the original tissue intact for future reference.
Understanding Pattern Layouts and Grain Lines
Pattern layouts aren’t arbitrary – they’re designed to ensure your garment hangs and moves correctly, and that your accessories behave correctly. Always align pattern pieces according to the grain line arrows printed on the pattern. The grain line should run parallel to the selvage (the finished edge) of your fabric.
I think I should mention here for those of you new to sewing that when I talk about pattern layout, I mean how the pattern is laid out on the fabric for cutting the fabric.
Most patterns will have a layout guide showing how the pieces could fit on the fabric, where the fold of the fabric is, where the selvedge edge of the fabric is, and whether the pattern is cut face up or face down. It will also show the number of pieces to cut, and if there are lining, interfacing, or other fabrics that need to be cut from the pieces.
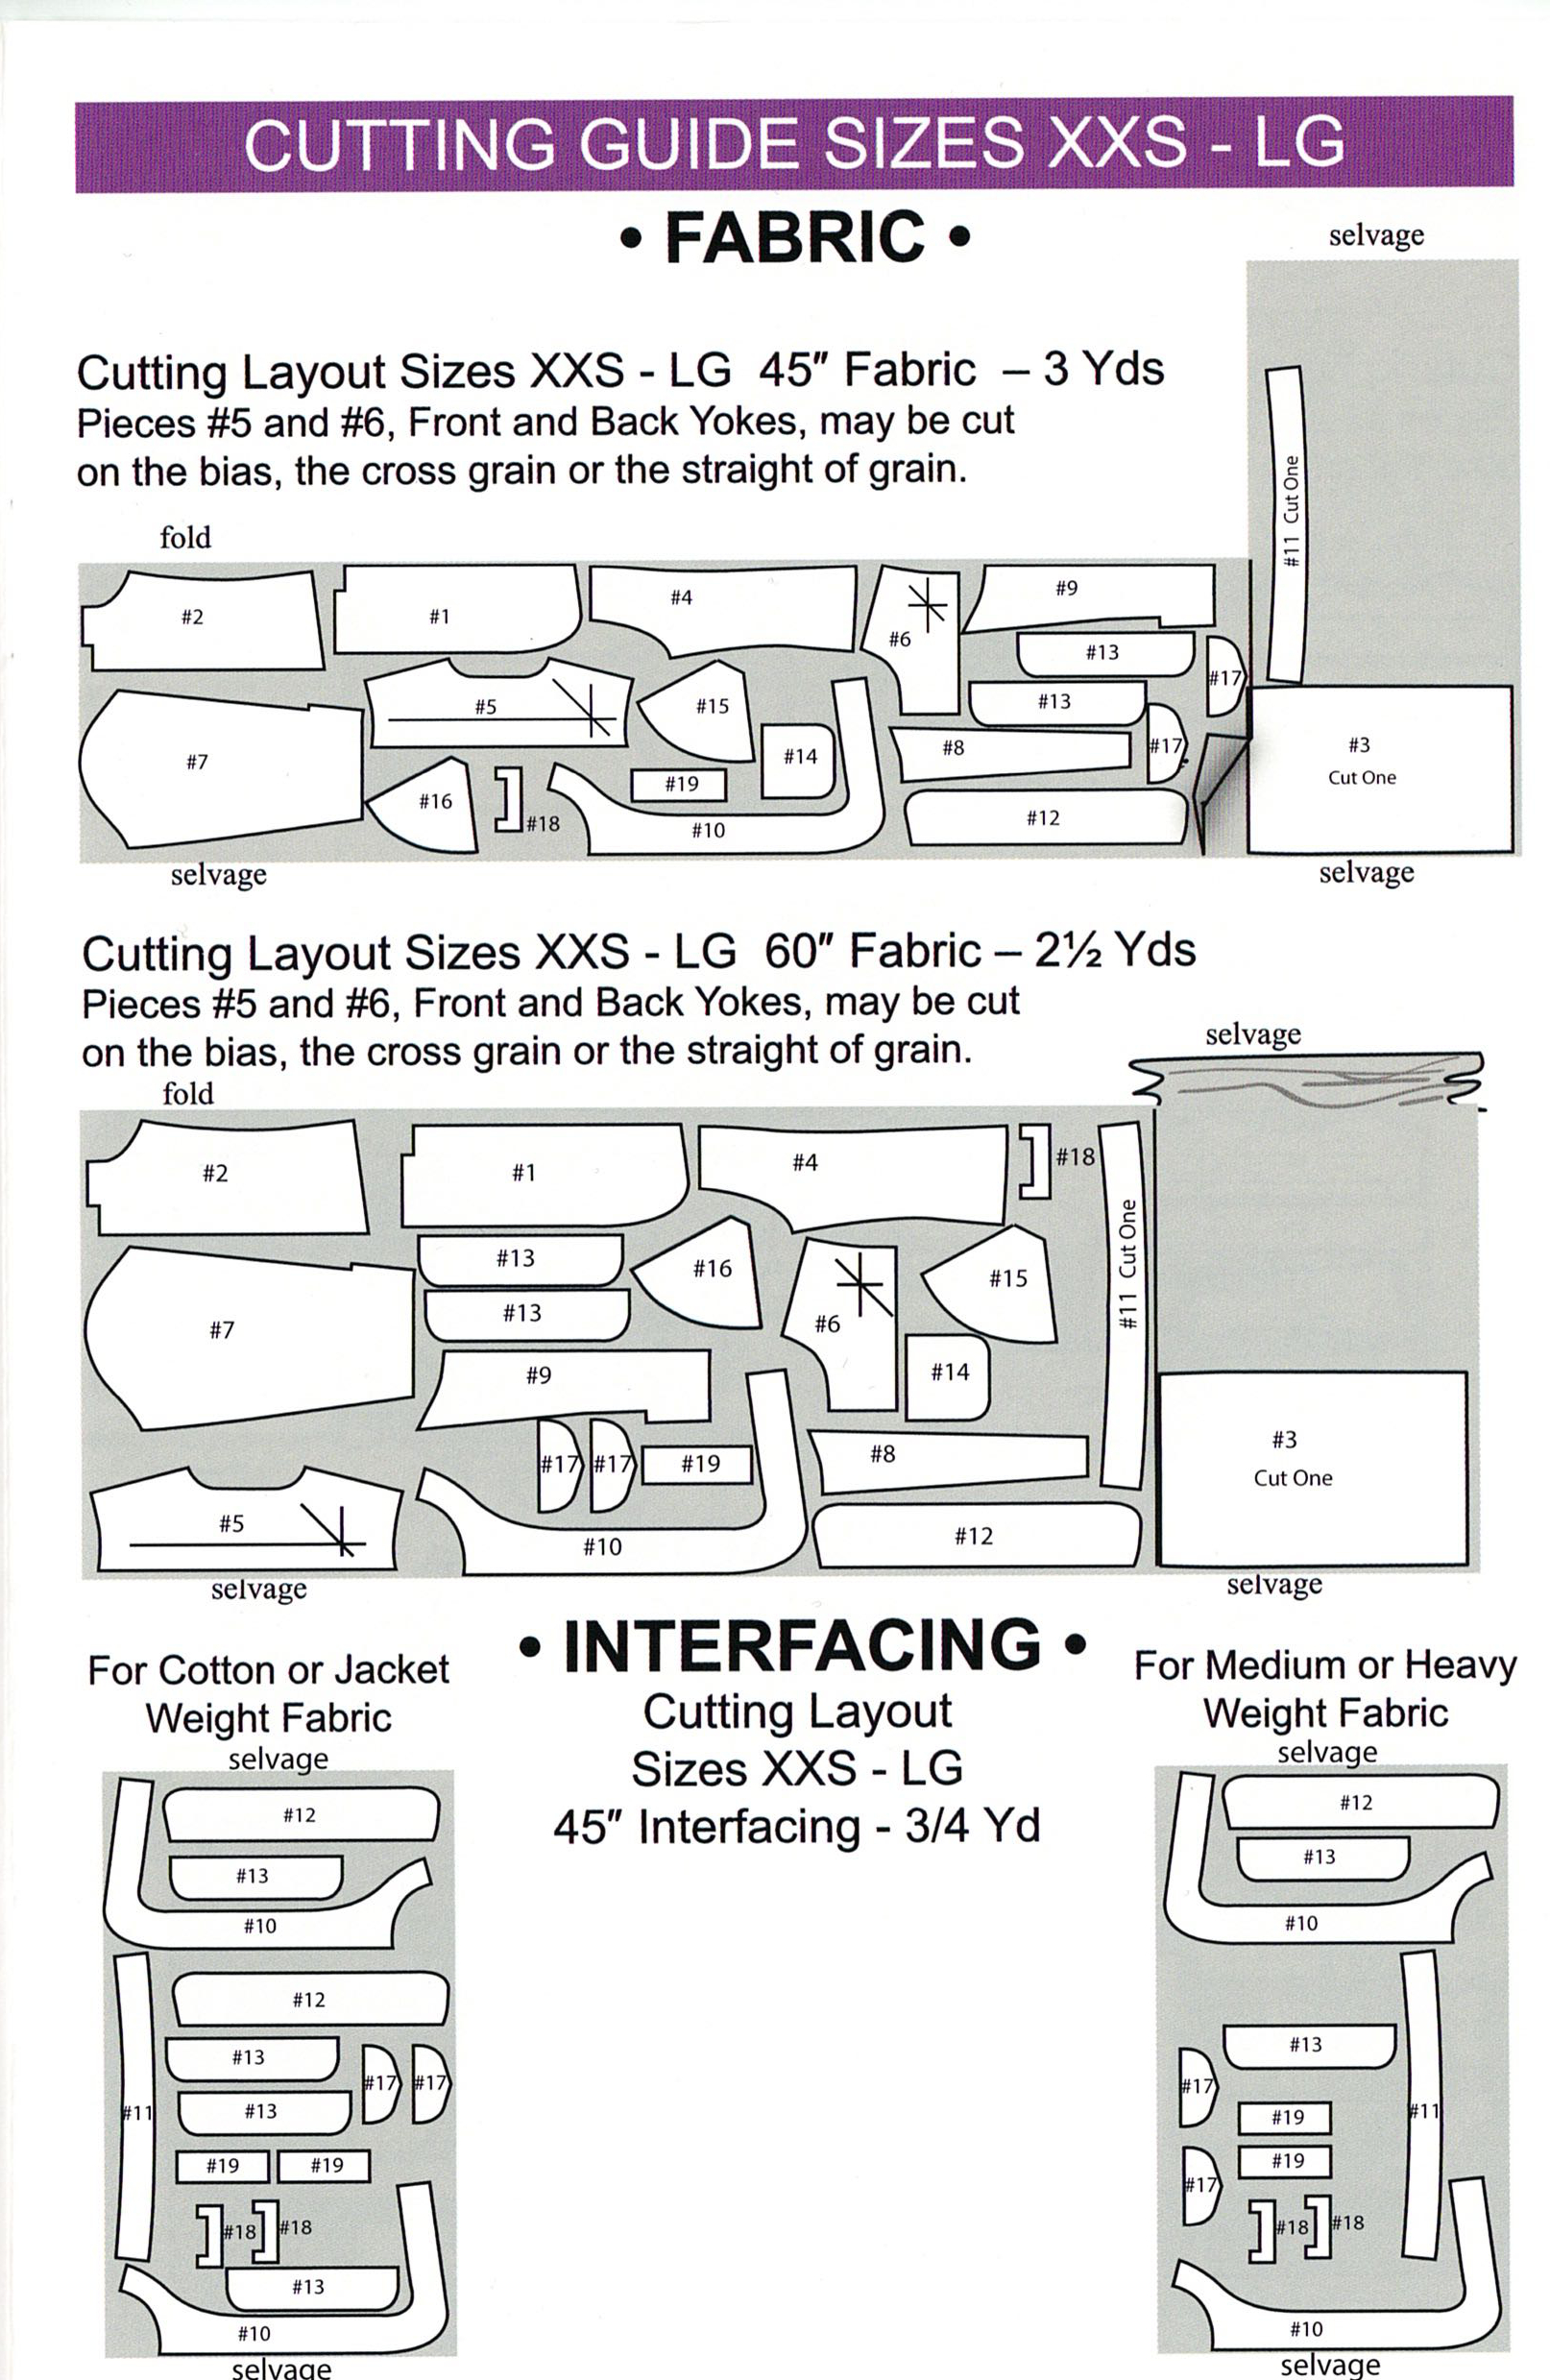
Example of Pattern Layout for Cutting
This pattern layout has nothing to do with the layout of the pattern pieces on the tissue when printed. The pattern pieces are put on the tissue in the most efficient way possible to conserve space. This means patterns can be going all different directions on the tissue, but you would not do that on your fabric, not if you want your project to behave as intended.
Pin your pattern tissue to the fabric secure enough so that it doesn’t shift when you start cutting it. Make sure your pin heads are not poking out over the cut lines. And make sure to not distort your fabric (bunch it up or move it around) when pinning.
Proper Cutting Techniques
Use sharp fabric scissors and cut with long, smooth strokes. Keep the fabric as flat as you can on your cutting surface and avoid lifting it while cutting. When possible, keep the fabric stationary and walk around your cutting table to maintain accuracy.
Once your piece is cut out, gently peel away the scrap so as not to distort the pieces or shift the pattern on the fabric before marking.
I prefer to mark my fabric with the pattern marks before moving the piece out of the way.
Pattern Marking Methods
There are several common marks found on patterns, and multiple ways to mark them on your fabric.
For beginner patterns, you’ll mostly need to worry about marking notches. These are small triangles found on the cut line of the pattern. Some pattern companies use a T shape, instead of a triangle shape. But the stem of the T will be on the cut line of the fabric. Notches are important because they help you align pattern pieces for sewing together.
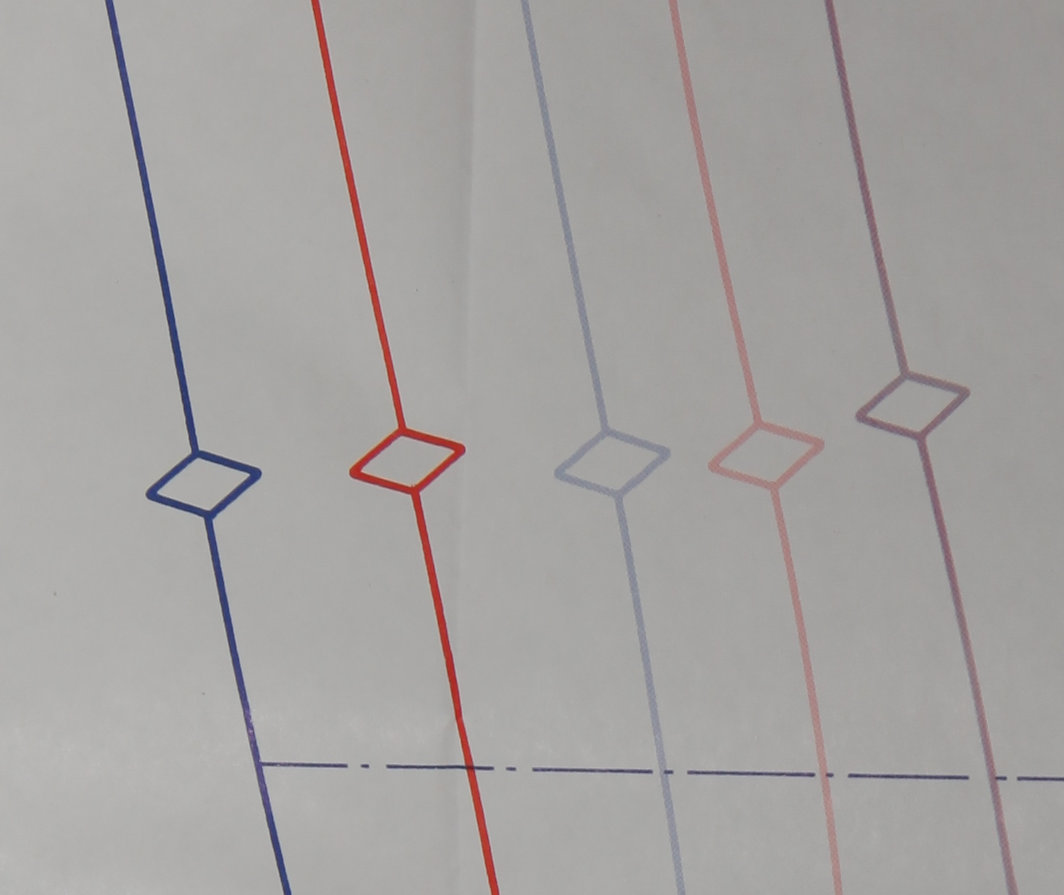
Notches
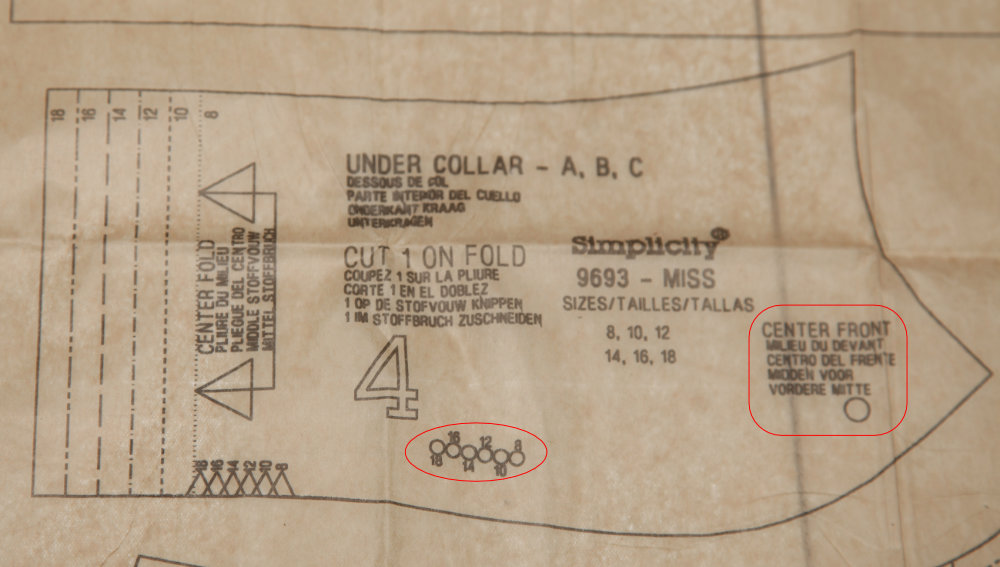
Circles
You might find dots or squares on the pattern. These are usually on the seam line (not the cut line) of the piece and indicate either places to start or stop sewing, or places to match up things.
You might also find additional seam or sew lines on the pattern, like in the case of darts or pleats. But these aren’t as common in beginner level patterns since darts and pleats are used for shaping garments. However, there are other times you can find a seam line on pieces that aren’t just for darts.
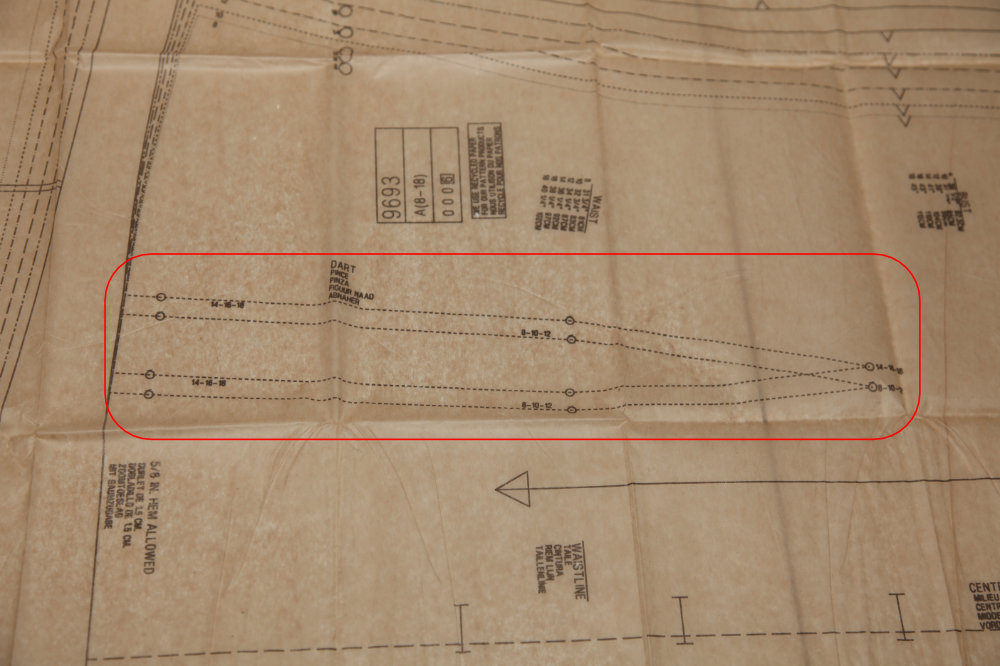
Sew Lines for a Dart
Lastly, you might see a Center line, or a fold line or some other marking that is supposed to help you assemble the project.
For most markings like dots and seam lines you will want to mark these on the “wrong side” of the fabric. That way, if the marking tool of your choice doesn’t completely wash out, it’s on the inside of the garment or accessory.
I like chalk lines for marking the face of the fabric, but always double check to make sure it comes out.
Using tracing paper and a wheel for marking seams and dots works well. Especially if they are in the middle of the pattern piece. Definitely double check the tracing paper to make sure it washes out if you are marking the face or right side of the fabric.
As for notches and any line like fold lines or center lines that intersect the cut edge of the fabric, simply snip into the seam allowance of your piece half the seam allowance or less. This will save you tons of time cutting your pieces out.
Setting Up Your Machine
Proper machine setup ensures quality stitching and prevents frustration during sewing.
There are several essential things to check for when setting up your machine.
- Threading
- Stitch Selection
- Thread Selection
- Thread Tension
- Needle Selection
Let’s take a peek at each.
Threading
Most sewing machines are threaded pretty much the same way, however check your manual for the threading path or procedure for both the top and the bobbin thread. Improperly threaded machines will result in either bad stitches or actual jams.
On the top thread, if you have a vertical spool holder that the thread spool spins on, check the thread spool, especially if it’s plastic to make sure no little bits hang off of it that the thread can get caught on. And if it’s the style of spool that has the notch to hold the thread when not in use, put that notch on the top so it doesn’t catch the thread. Likewise if you have a horizontal holder, place any notches etc away from the needle side of your machine, or make sure you have a big enough end cap to allow the thread to pass over the end of the spool.
On the bottom thread, or bobbin thread, make sure you insert the bobbin correctly according to your manual. Yes, the direction the bobbin spins when the thread is being pulled out of it will make a difference. Check your manual for your machine specifics.
Stitch Selection
Choose the stitch needed for your project. Most projects will use a straight stitch. However, if you are sewing close fitting knit garments like leggings, you will need a stitch that stretches. I like to use an overedge/overcast/overlock type stitch for knits.
The straight stitch setting usually just looks like a dashed line on your machine. (Always double check your manual though). And you will really only have stitch length to dial in. The most common stitch lengths for sewing basic seams is 2 to 3 mm. That means each little stitch is only 2mm long (or 3, or 2.5 whatever you have it set at). Be aware that some machines (like my 1975 Kenmore) has stitch length in stitches per inch. In this case, you want 8-12 for the general stitch. A stitch length of 10 stitches per inch gets you about 2.5 mm long stitches.
For the sake of this tutorial, the fabrics you will be sewing with are fine with a stitch length of 2.5 mm or 10 stitches per inch. If your machine defaults to something else, (like 3 mm) that’s fine too.
A zig-zag stitch (often used for finishing edges – more on that later) and the overedge type stitches also have a stitch width setting. Most machines will default to some width. One of my machines defaults to roughly 1/4” wide (about 6 mm) and the other defaults to about 3/8” wide which is about 9 or so mm. It’s good to know the default because you might need to change it if your pattern has a different seam allowance (and you’re doing an overedge stitch).
On some machines, the stitch length for stitches like the overedge and some decorative stitches have “pattern density” rather than stitch length. This just means that you either squish the pattern up more (shorter stitch length = more dense), or you stretch it out (longer stitch length = less dense). Fortunately, on my machine it has a little diagram that shows me what direction is what adjustment. Check your manual.
The last thing I want to mention about stitch selection is Foot selection. If your machine came with a variety of feet, it’s possible that the manual will suggest different feet for different stitches.
And for the love of everything fluffy and wholesome, do not try to sew a zig-zag stitch of any kind if you have a straight stitch foot (or needle plate) set up in your machine. These really awesome accessories (straight stitch foot and needle plate) only have a small hole for the needle to go through. And it’s set up in the default position of your machine so a zig-zag stitch would try to sew through the foot on either side of the hole. This will result in a shattered needle, if not other issues. This goes for zipper feet as well, since they often have metal or plastic on at least one part of the zig-zag pattern.
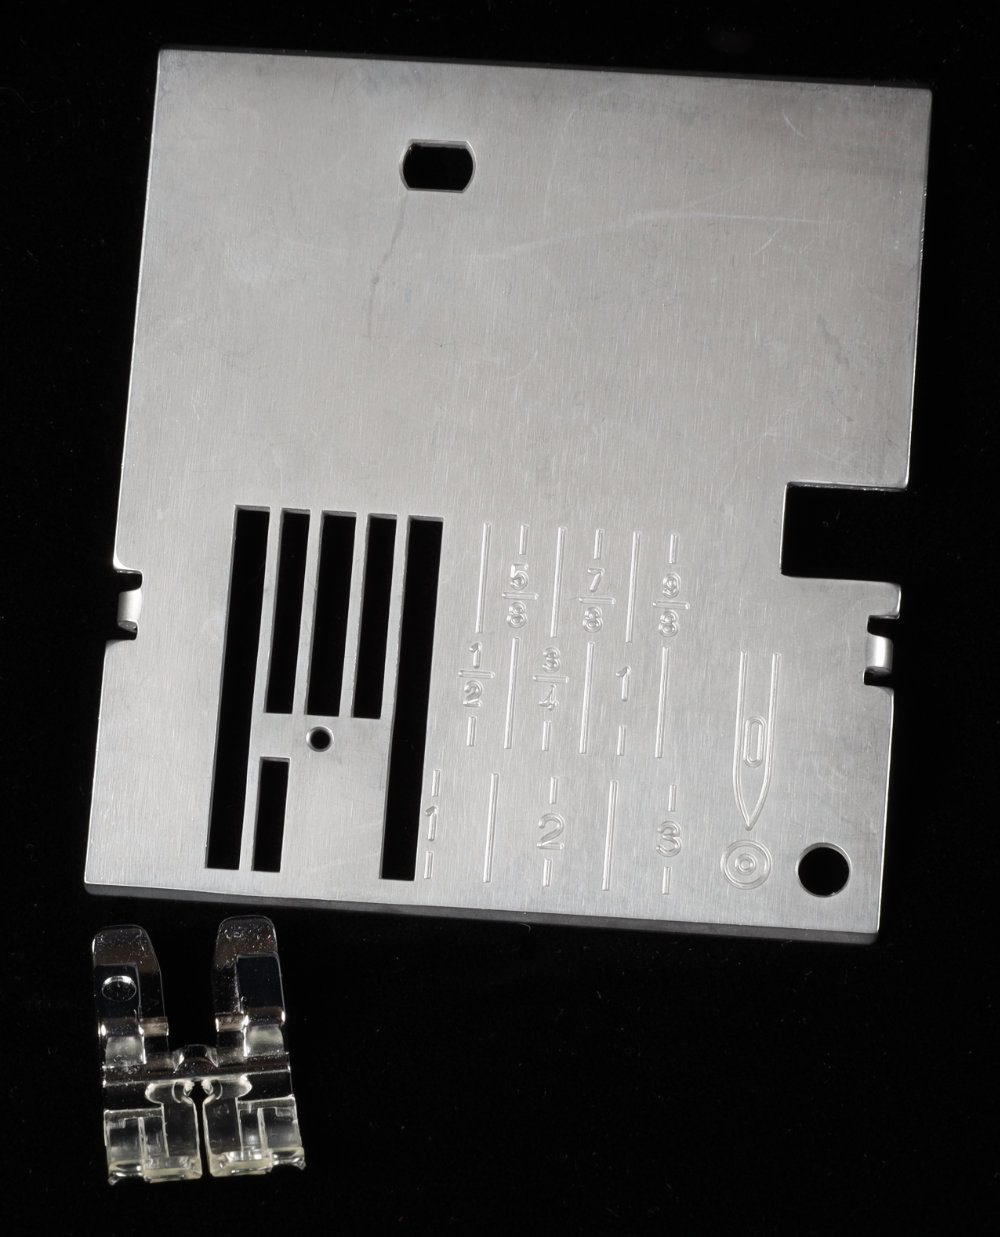
Straight Stitch Needle Plate and Foot
Thread Selection
For all projects and fabrics suggested in this tutorial, general all-purpose thread is your best bet. I mentioned this in the tools and notions section.
Do not use serger thread.
And make sure you have the same thread (at least the same type, if not color) in both the top and bobbin thread. This will help you get a balanced stitch when adjusting the tension.
Thread Tension
Balanced tension produces stitches that look identical on both sides of the fabric. If your tension is off, you’ll see loops on either the top or bottom of your fabric.
Most machines have a tension dial you can use to adjust your top thread tension. More on this in just a bit. But many machines don’t have an easy way to adjust the bobbin thread tension. On some machines with a bobbin case that you insert your bobbin into before inserting it into the machine, there’s a tiny screw that can be adjusted. However, if your machine is new, I’d just keep it at what it was “set” at from the factory. The more “set it and forget it” the bobbin thread is, the better. This does mean if you are using a thread other than the average all-purpose thread, you may have issues.
For the top thread, start with the default tension setting (usually around 3 or 4 – check your manual!) and adjust as needed. I always like to do a test stitch to double check all my settings. More on that in a bit too.
Needle Selection
One of the easiest ways to mess up your sewing is to pick the wrong needle. There are lots of different types of needles out there and most of them come in a variety of sizes. And that’s just counting the ones that are most commonly used for home machine sewing. If you have an industrial machine of any kind check your manual you may need a different style of needle than the typical style for home sewing machines. And also, if you have a sewing machine brand that specifies to use ONLY that machine brand’s sewing needle (cough Singer cough) then definitely start with that. When you get more confident in your sewing you can experiment and see if other brands work.
So, there’s the shank type which either will be the standard one, a singer one or … something for an industrial.
But then there’s also the “TYPE” type, like universal, ball-point, stretch, metallic, microtex, jeans, denim, embroidery.
My rule of thumb is:
For woven fabrics, start with a universal and if it works fine, stick with it. If not, try a microtex. The microtex seem to work better for really dense weaves like some of the polyester suedes I’ve used or super delicate finishes like satin.
For any fabric that contains spandex or elastane, if the universal doesn’t work, use a stretch needle. And if it’s a knit fabric with spandex, just start with the stretch needle.
For knits that are super loose like sweater knits or don’t have spandex, you can try a ball-point first.
Size-wise, most fabrics are fine with a mid-range needle. Think size 70/10-90/14.
I usually use 11 for knits and 12 for wovens.
Most guides say something like this:
- Lightweight fabrics: Size 60/8 or 70/10 needle
- Medium-weight fabrics: Size 80/12 needle
- Heavy-weight fabrics: Size 90/14 or 100/16 needle
But, I don’t find that to be universally true. It might be a good place to start, but I have heavy-weight fabrics that sew best with a 10. And I RARELY sew with a 14, and even less frequently use a 16 or higher. And that’s even when I’m sewing upholstery fabric, multiple layers of denim or corduroy.
And keep in mind that the smaller the needle, the smaller the eye of the needle, and the harder it will be to thread it (so size 8 and 9 can be challenging). Plus if you have thicker thread, it’ll be more likely to chafe against the needle eye and break, especially if it’s cheap thread. That’s why going with a good brand of all-purpose thread really is your best bet to start with.
Essential Sewing Skills
The actual act of sewing a seam is a skill you can learn. And getting it consistently right will take practice. Here are some things you need to know to sew well.
Understanding Seam Allowances
Seam allowance is the distance away from the cut line to the stitch line.
Most patterns include seam allowance on the pattern pieces. Double check to make sure that 1) it does, and 2) what that seam allowance is. It used to be that most patterns used a 5/8″ (1.5cm) seam allowance. But more and more patterns are using something else, especially for activewear or knitwear, or anything that is designed to be sewn on a serger as an option.
Common seam allowances are 1/4” (6mm) or 3/8” (about 9mm) for activewear and serger instructions.
Let’s talk about seam allowance with a stitch that isn’t a straight stitch, for example an overlock or overedge stitch. This is a stitch that sews the seam on the left side of the stitch pattern (usually) and will move the needle to the right to overcast or finish the edge of the fabric. The distance it moves is usually adjustable, and will be default to probably 1/4” or 3/8” on your machine. The seam allowance should be measured from the edge of the fabric to where the LEFT-Most line of stitching is formed. This is often left of center from where your straight stitch is placed. (Though this is true on my machine, I used one of my friend’s machines made by Brother, and the default location for the straight stitch was on the left side and so the overlock had the same position.)
Knowing this matters when you are using the guide on your needle plate as an indication to line up your fabric for the correct seam allowance. More on that in a bit.
And always be on the lookout for pieces labeled or instructions that call out a different seam allowance. You might see a general statement “all seam allowances 5/8” except where noted.” And the notation can be in the actual instruction or on the pattern tissue itself.
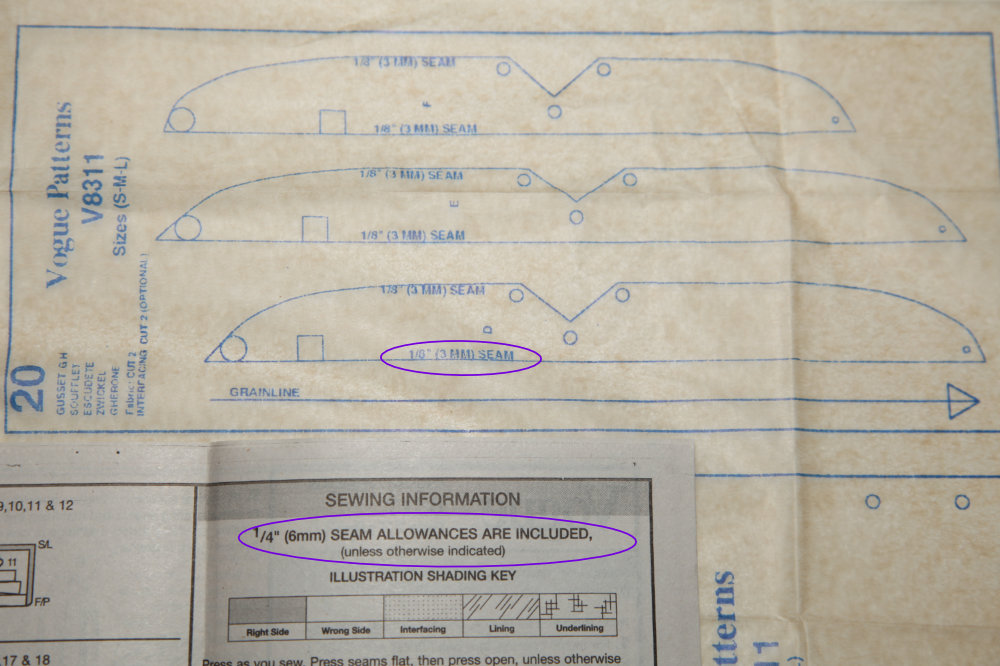
Seam Allowance in Instructions and on Pattern Piece
Maintain consistent seam allowances by using your machine’s seam guides on the needle plate or marking the bed of your machine with masking or painters tape. Accurate seam allowances are crucial for proper fit and professional results.
Sewing Consistent Seams-Straight &Curved
We talked about seam allowance, so rather than thinking about sewing straight lines, its better to think about sewing with a consistent seam allowance. When you master this, that means that it doesn’t matter if the seam line is straight or curved, you will have a consistent seam allowance and professional results.
So, how do you do that?
First don’t look at the needle. Unless something breaks, your needle will go up and down and you don’t have to worry about it. I only recommend looking at the needle at the VERY beginning of a seam to make sure you are in the right spot and not causing a jam and then only periodically glancing at it to make sure the thread isn’t balling up or something else going weird. On VERY rare occasions like when the seam allowance is so small, do I look at the needle. And when you are first learning to sew, there are very few reasons to have a small seam allowance (like 1/8”).
Figure out where on your needle plate or presser foot that the edge of the fabric needs to be in order to be the correct seam allowance. You might need to tape something as a guide.
So, keep your eyes focused a little in front of the needle/presser foot so that you can see how the fabric is getting pulled into the feed dogs and stop any thing bad from happening (like extra layers getting caught up).
Sew at a steady pace at your comfort level of speed, keeping the edge of the fabric lined up at the mark you noted for seam allowance.
Remember, if you are sewing a curve, the seam allowance needs to be correct at the needle. So, depending on the curve of the fabric, you may not be lined up in front of the needle exactly. Do not try to straighten the piece you are sewing just to make the edge straight while sewing it. It will deform what you are sewing.
Here is a VERY BIG POINT.
Do not PUSH or PULL your fabric. Let the feed dogs do their job. Their job is to pull the fabric through at the rate determined by how much you’re pushing your pedal down, and the stitch length.
If you push your fabric into the presser foot, you can distort your stitches or cause other issues. If you pull your fabric you will like distort your stitches and possibly break needles.
Just don’t do it. If you want to sew faster, push your pedal down further. Or take off the speed control if it’s on.
One of the best ways to get more comfortable with your machine without messing up fabric is to use paper.
I bet you even have some junk mail you wouldn’t mind putting holes in.
Just use a needle (one you don’t mind dulling) and no thread. You can use the edge of the paper as the edge of the “fabric” to practice sewing seam allowances.
You can draw curves cut your paper to get more practice getting consistent seam allowances on curves.
And you can speed up and slow down to see how your machine reacts.
And with the needle, you can see where you’ve sewn, and how well you did. But you can also measure stitch widths and lengths.
Just keep in mind that paper is far more stiff than most fabrics so it won’t behave exactly like fabric. And when you go to sew those curves on the fabric it will be a little more difficult than with the paper.
But keep practicing. You can do this!
Backstitching and Securing Seams
One last thing about sewing seams is that for the most part it’s a good habit to get into to “Lock” your seam.
Typically, this is done by one or two backstitches at the start and end of each seam.
I like to start my seams one or two stitches in from the edge and then backstitch to the edge and then sew forward. Take care to not backstitch too far off the fabric because getting it started again without jamming can be more challenging.
At the end of the stitch you can just do a backstitch or two before sewing off the end of the fabric.
Some machines have an automatic stitch locking feature that will essentially do the lock by stitching in the same location a couple of times.
Honestly, I find it more cumbersome to use it on my machine for most stitches than just backstitching. But it is a neater-looking option for decorative and other patterned stitches like the overlock.
Another way to accomplish this (this is an “advanced” trick so now you’re in the know) is to sew 2 to 4 stitches with a very short stitch length like 0 or 0.5mm. No backstitching. This is a really nice option for flimsy fabrics and darts and pleats.
Can you get away without locking your stitches? Sometimes. For example, when the seam will be sewn over with another stitch or two (crossing seams). But, do you want to risk it? I don’t.
Seam Finishing
There are two or three (depending on how you count) essentials for finishing seams. And these essentials, along with consistent seam allowances, will elevate your finished project from homemade (in a bad way) to handmade (in a good way). So, it goes almost without saying, but I’m going to say it anyway, skipping these will make your finished project look unprofessional and amateur.
And even if you want to skip some of these to save time and don’t care about the apparent quality of the finished product, in some cases, skipping these steps does not save time.
Pressing Techniques
Most seams need to be pressed after sewn. Pressing is different from ironing. To press, place your iron on the fabric and hold for a little bit then raise the iron and put it down in another spot. Don’t drag across the surface (that’s ironing). Now, sometimes it makes a little sense to kinda drag, but the dragging is just to use the iron as a third hand or an additional finger to help maneuver what you are pressing.
Classical instructions will tell you that you need to press the seam as sewn (flat), and then press the seam open with the seam allowances parted or pressed to one side or the other according to your instructions.
I am here to tell you that in everything I’ve ever sewn, I do NOT press as sewn first, unless I absolutely need to do something to help shape the seam in that state. That being said, I don’t sew couture and so I cannot speak to that. (However, I suspect you can probably get away from pressing as sewn in many, if not all, circumstances.)
I do press seams open. And it completely depends on the instructions and how I want the seam to lay, etc as to how I press the seam allowance. If I’m following the instructions of a pattern, I press the seam allowance as the instructions say to.
Depending on your fabric, steam may be used. And this is where some of those awesome pressing tools can come in handy.
Clipping and Notching Curves
When I said two or three essentials to finishing seams, it depends on how you view clipping curves. You can view it as just part of how you have to deal with pressing curves. OR, you can view it as it’s own technique.
Why do we clip curves? Simply put it’s so the curve lies smooth when the seam is pressed open. And this is true regardless if you are pressing the seam allowance open or to one side.
At the very least, you need to clip the seam allowance of the curve, up to but not through the stitch line. This works great for inside curves (concave) where when turned, the seam allowance needs to spread. This is because the cut line length is shorter than the seam line length and therefore when pressed to one side it will need to grow or stretch, and the seam will be misshapen if not clipped.
If you need to reduce bulk in your seam, you can notch outside curves (convex) so that when turned the seam allowance doesn’t overlap with itself. This is because with convex or outside curves, the cut line length is longer than the seam line length so there’s more fabric in the seam allowance than the body of the garment or accessory you are making, and it will wrinkle if not clipped, and it will overlap if not notched.
There are additional techniques for clipping curves that can sometimes save time.
Also note that if you are making something two-sided with a double layer of fabric like a collar, cuff or a flap on a pocket, you may have corners that you need to turn and these need to be clipped as well. to remove the bulk of the seam allowance. Just be careful not to clip too close to the seam line.
In general, you’ll clip your curves and corners before pressing, even though pressing those pesky pieces gets cumbersome. That’s why I advocate for a pointy tip on the iron, it helps to separate those bits of seam allowance.
Basic Edge Finishes
Most woven fabric will fray after being cut and needs to be finished in some way.
Here are two simple ways to finish the edge of woven fabric:
- Zigzag stitching along the raw edge of the seam allowance careful to not catch the stitch line. The needle can fall off the edge of the fabric on the outside edge.
- You can also use an overlock, overcast or overedge stitch as you would a zig-zag.
- Trim the seam allowance with Pinking shears (note this can work for curves as well, especially if you are told to trim your seam allowance down to 1/4” or 1/8”)
There are other methods as well, but the above two are the best for beginners.
But, what about knits you might be thinking. Well, knits are interesting. MOST knits don’t fray or unravel when cut, at least not without a lot of encouragement.
So, many knits don’t need to be finished.
However, if you want a more professional look you can still finish your knits. But I would suggest using an overlock, overcast, or overedge stitch.
And keep in mind, that if the initial garment (or accessory) was sewn with an overlock (etc) stitch, the edges are already finished.
And keep in mind also if you used an overlock stitch, when you press your seam open, you will not be pressing your seam allowance open. It has to be pressed to one side or the other.
Moving Forward
Now that you understand a little more about what sewing entails, let’s move on to discussing time management in sewing projects. Knowing these fundamental skills will help you better estimate how long each step will take and plan your projects effectively. In the next section, we’ll explore strategies for breaking down projects into manageable sessions and creating realistic timelines for completion.
