Pattern Selection
Now that have a better idea of what kind of project to choose for your first sewing project, it’s time for one of the most important steps: choosing the right pattern! (That is, if you haven’t picked up my tote course or zippered pouch course because those both contain the patterns in them.) Pattern shopping can be overwhelming. There are tons of options to choose from and knowing what to look for first isn’t obvious. But don’t worry, I’ll guide you through everything you need to know to make confident pattern choices.
Understanding Pattern Basics
Let’s start with the different types of patterns available today. When I first started sewing, we only had traditional paper patterns from the big companies. Now we’ve got so many exciting options!
Commercial patterns are what you’ll find in fabric stores from companies like Simplicity, McCall’s, and Butterick (which are all the same company now). These can be great for beginners because they come with detailed instructions and are widely available. And they are typically created following a standard for pattern drafting and pattern instructions. So, buying from these will give you predictable content, if you will, regardless what company you purchase from.
Indie patterns are designed by smaller, independent companies. They often come with more detailed instructions and sometimes even video tutorials. It’s been my experience that they range in beginner-friendliness due to the instructions. Many follow the same standards as the commercial patterns, but some write less detailed instructions or have fewer photos to help.
Then there are the “free online pattern download” type patterns you find on the web. These can be hit or miss. Creating a pattern with a full write-up on how to assemble it with all the extra information found in commercial patterns take a lot of time. And isn’t something anyone should be giving away for free. So often you get a few shapes and maybe a note about seam allowance and you’re on your own from there.
Most pattern companies now offer PDF Patterns. These are digital files you print at home or at a copy shop. While they require some assembly (think of it like a puzzle!), they’re instant to download and you can print them as many times as you need. Super handy when you want to make size adjustments!
Lastly, you can often browse patterns online and see images of the front and back of the envelope. That can save you time when you go to shop for them in person. That is, if you shop for them in person.
Often stores or companies have sales on patterns. I used to stock up when they would have $0.99 pattern days. And while I haven’t seen that price in years, if you can get them on sale, it will put some money back in your pocket because patterns are an investment that don’t always come cheap.
As a beginner, I don’t recommend trying to learn a lot about pattern drafting and manipulation right out of the gate. But just keep it in the back of your mind that down the road, it’ll become more beneficial to learn more about this for better fitting garments and even for creating designs off of basic patterns you already have. And that will save you money.
Reading Pattern Envelopes
Don’t let pattern envelopes intimidate you! They’re actually treasure troves of information. The front usually shows the finished garment or accessory (though remember, your version might look different depending on your fabric choice), while the back contains all the crucial details you’ll need.
A word about patterns for clothes: Often, if the final garment is an illustration and not a photo, the proportions will be elongated. This means that pants that are drawn onto a fashion figure will look longer and slimmer than they will in real life. I don’t have a quick tip to let you know how these clothes will fit on your body. But I do want to raise awareness because it is quite disappointing sewing something that doesn’t fit you like it does the model or figure on the front of the envelope.
Pattern difficulty ratings are your friends – they’re like little warning signs telling you what you’re getting into. But here’s a secret: sometimes a “beginner” pattern can be tricky, and an “intermediate” one might be easier than you think. It really depends on the techniques involved and your comfort level.
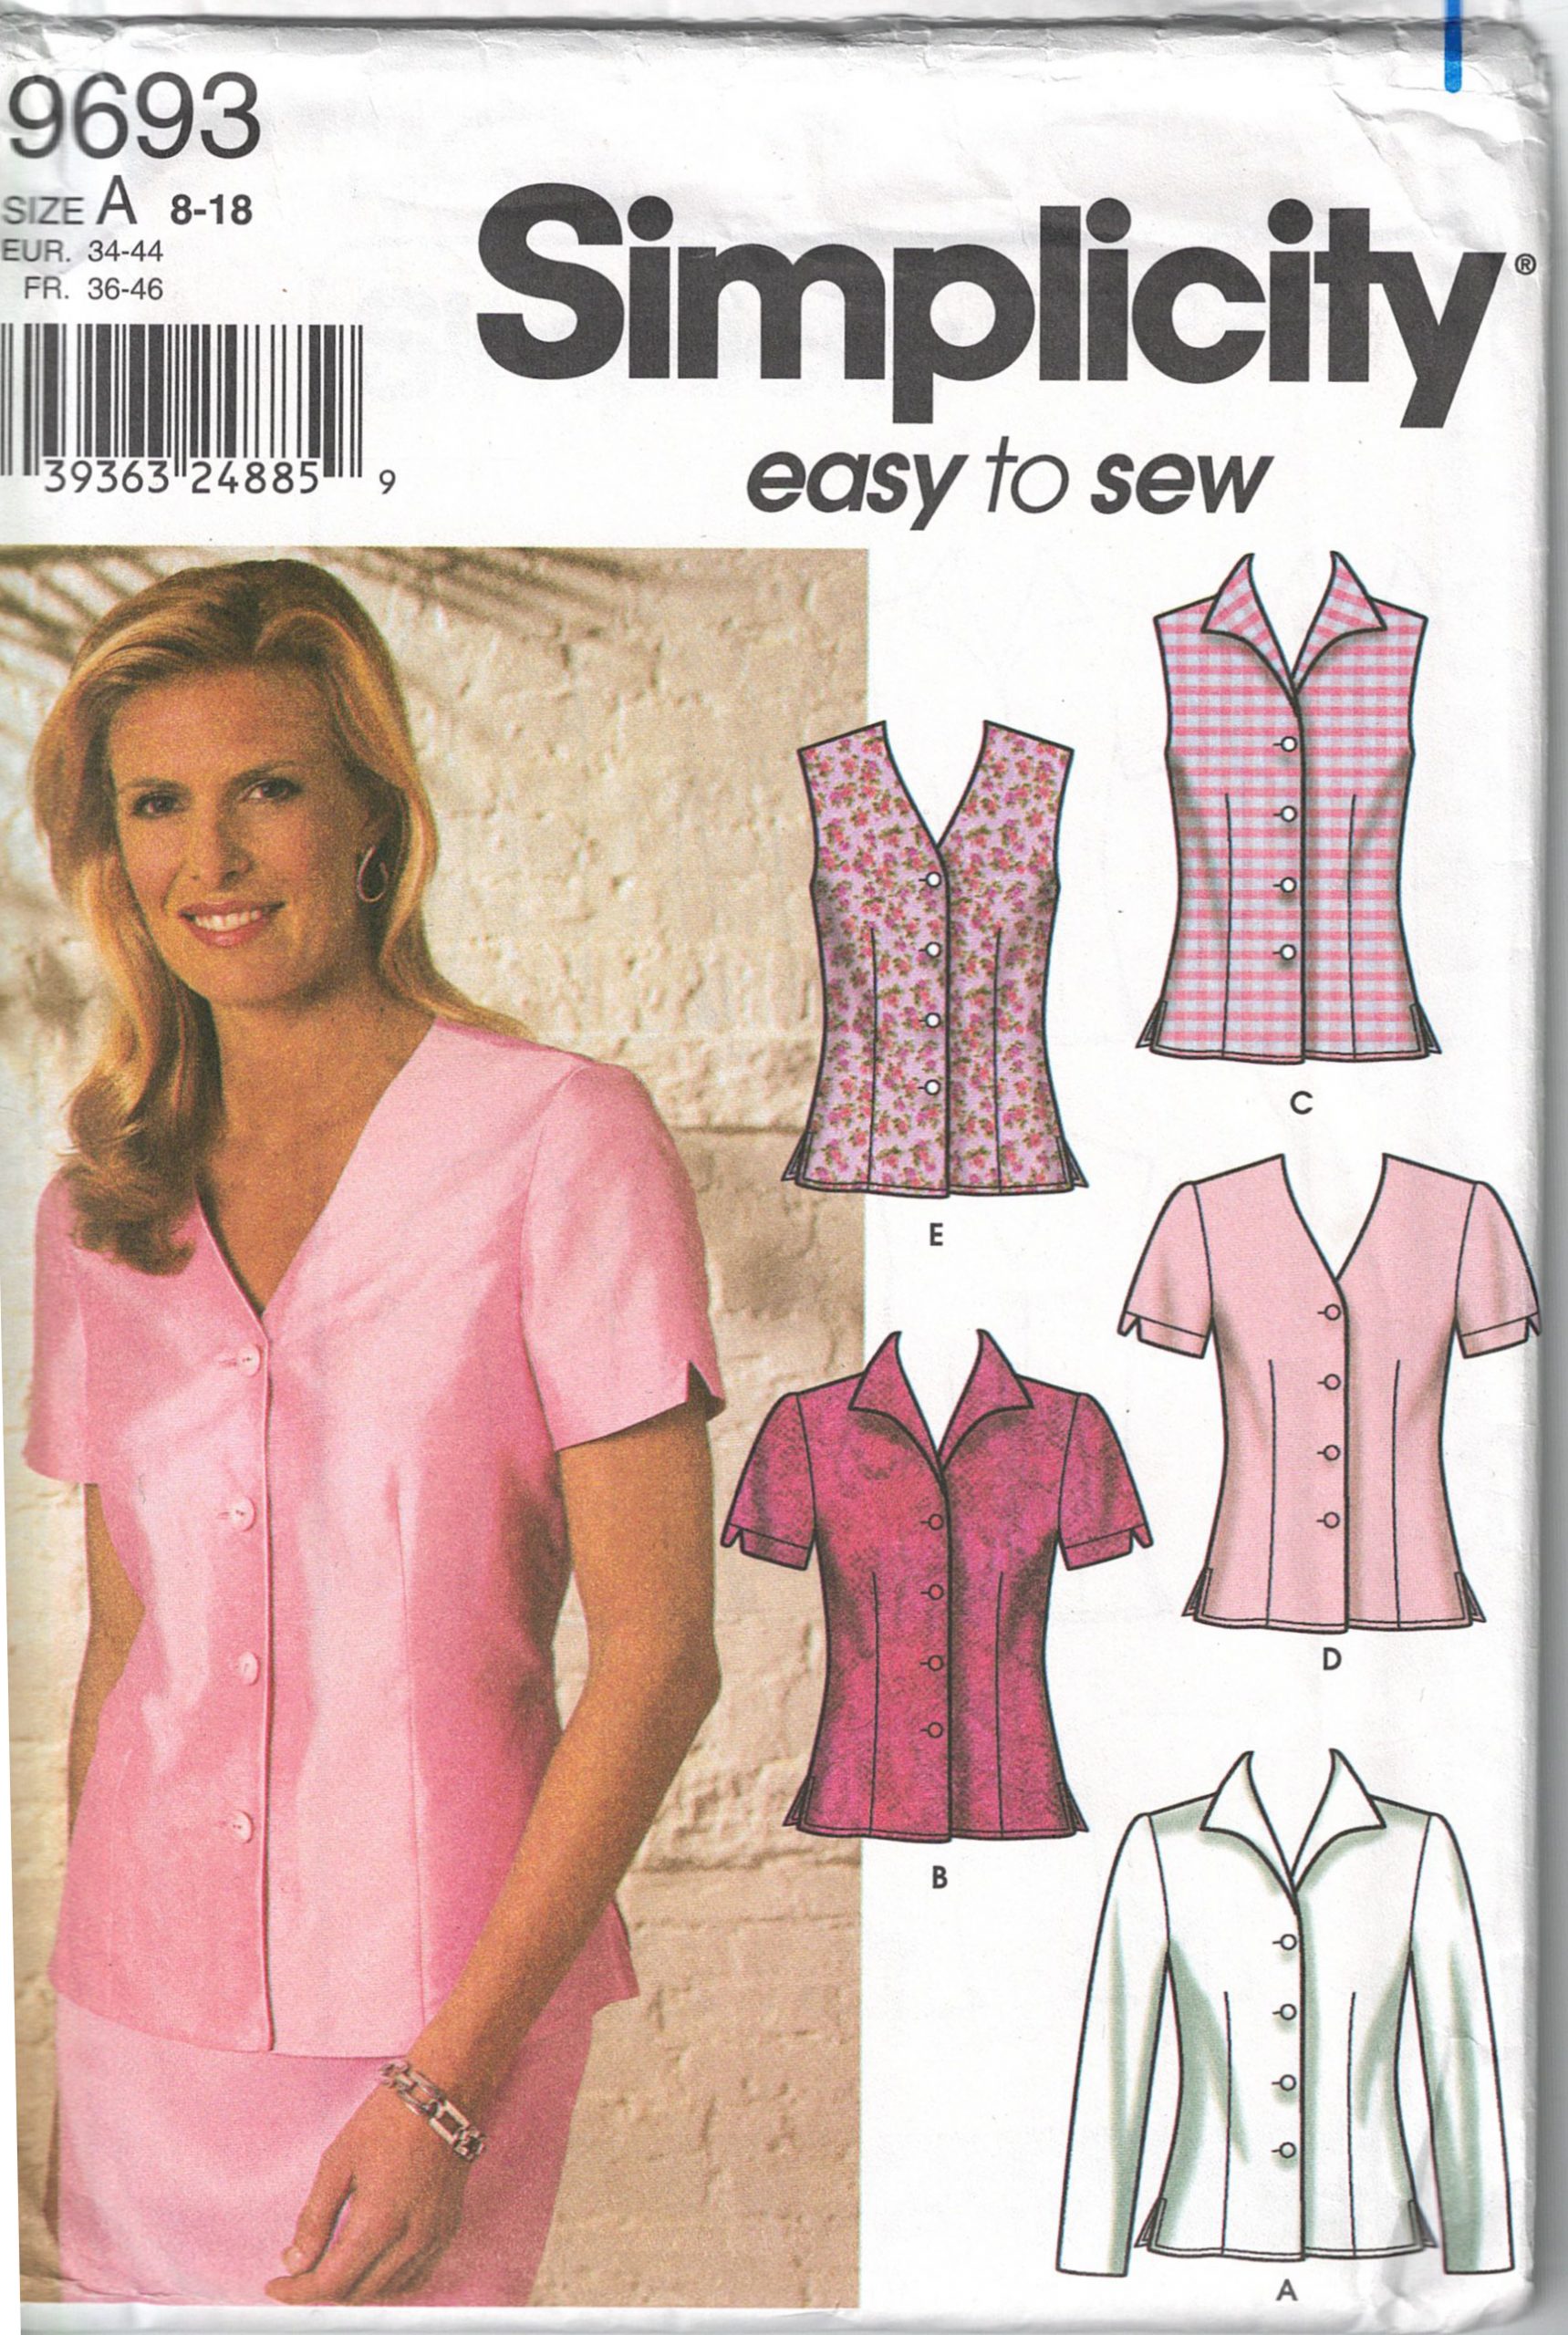
Pattern Envelope Front
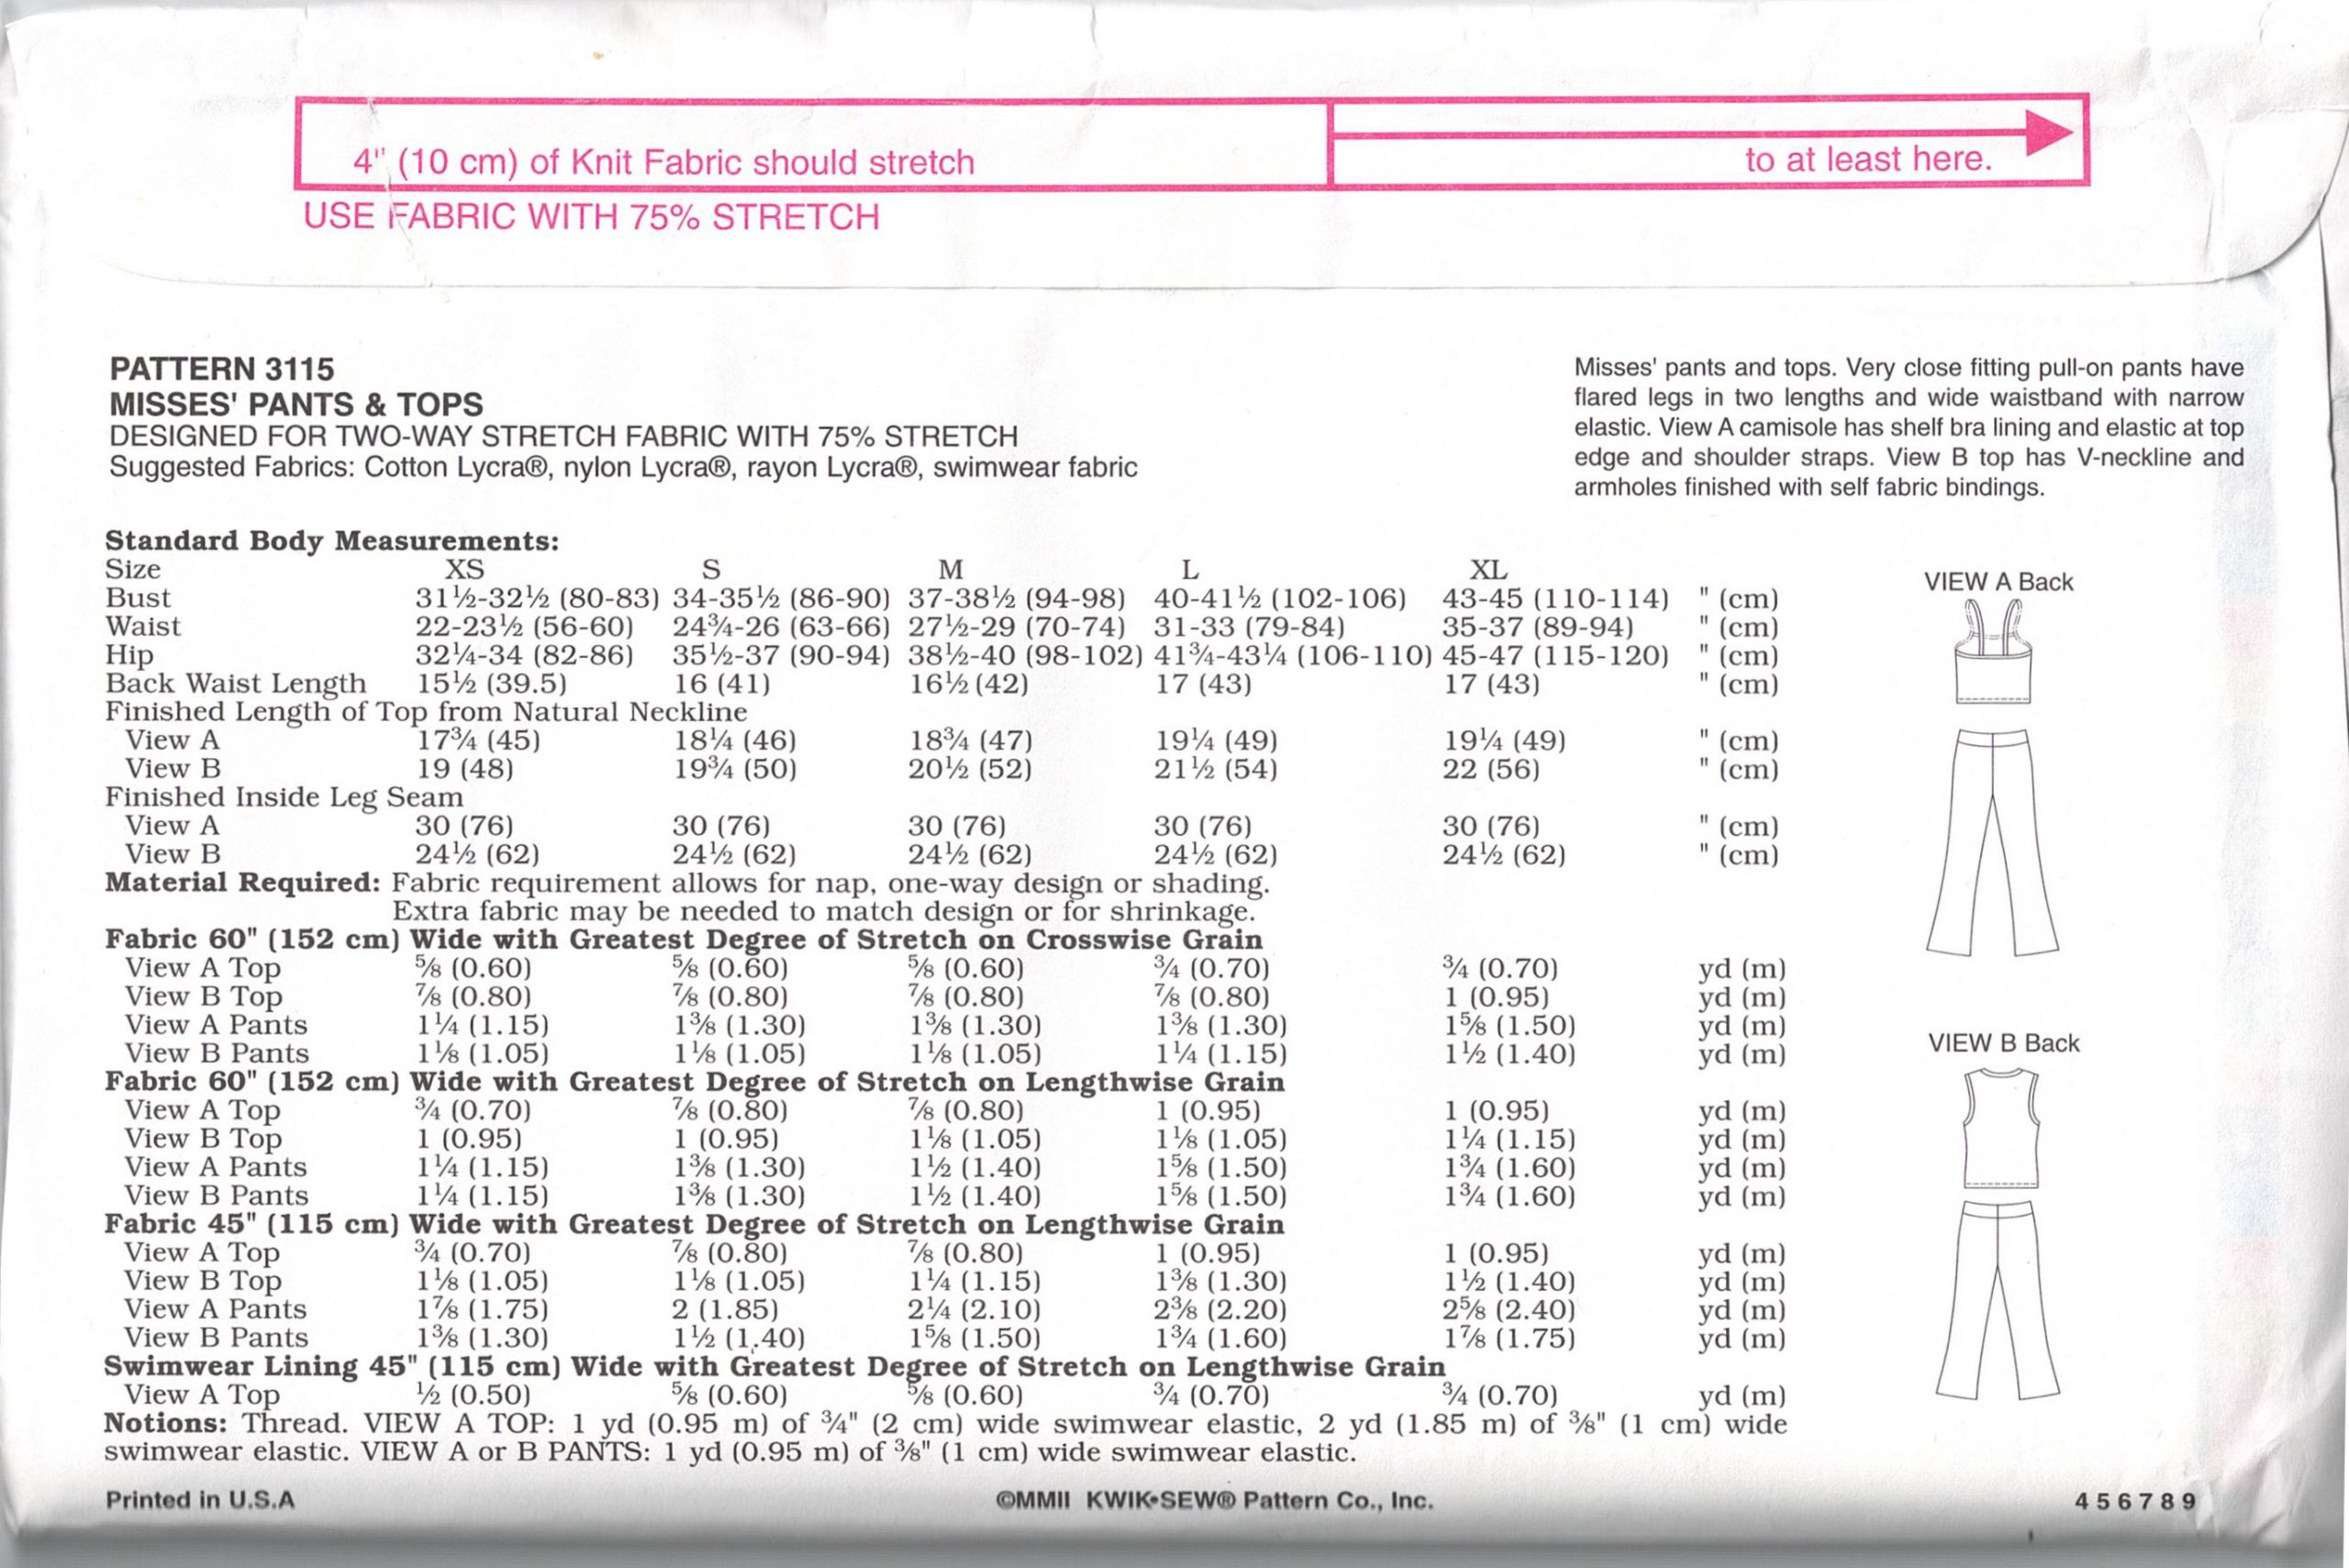
Pattern Envelope Back
Pattern Requirements
Understanding pattern requirements is crucial for project success. Think of it as your shopping list! The back of the pattern envelope lists everything you’ll need – from fabric yardage to buttons, zippers, and interfacing.
When it comes to tools and notions, don’t skip anything listed. I learned this the hard way when I once thought I could do without interfacing (spoiler alert: the collar was a disaster!). Each item is there for a reason, and having everything ready before you start makes the whole process so much smoother.
For fabric requirements, always buy a little extra than what the pattern calls for – especially if you’re new to sewing or if the fabric needs pattern matching. Trust me, it’s better to have a bit too much than not enough!
For beginners: Look for fewer notions. Avoid invisible zippers (they are a little more challenging than regular zippers) and lots of buttons (until you want to tackle them). Be wary if there are hooks and eyes listed, they are often above a zipper (more on identifying beginner zippers later). And compare the quality of the fabrics listed to what is beginner-friendly (more in the next section). Look for terms like stable knits if it’s a knit pattern, and medium weight woven fabrics for woven type patterns. Note that sometimes a pattern will have multiple garments included and may require different notions or fabric. For example a pair of pants that need a woven fabric and a zipper, and a top that’s in a stable knit with a button.
A word about interfacing. I used to buy only non-woven medium weight interfacing. And I used it for everything. But more recently, i’ve been using a lightweight woven interfacing for pretty much all my clothing and even most accessories. You can always buy a little of each and test a swatch with your fabric to see how it behaves.
Pattern Sizing and Adjustments
Many clothing patterns still come in groups of 3 to 4 sizes in the envelope. Some companies are now offering many or all their sizes in one envelope. So be sure you know what you are buying so you don’t buy the wrong size.
Here’s something that might surprise you: pattern sizes are different from ready-to-wear sizes. Don’t panic if the pattern size seems larger than what you usually wear – it’s totally normal!
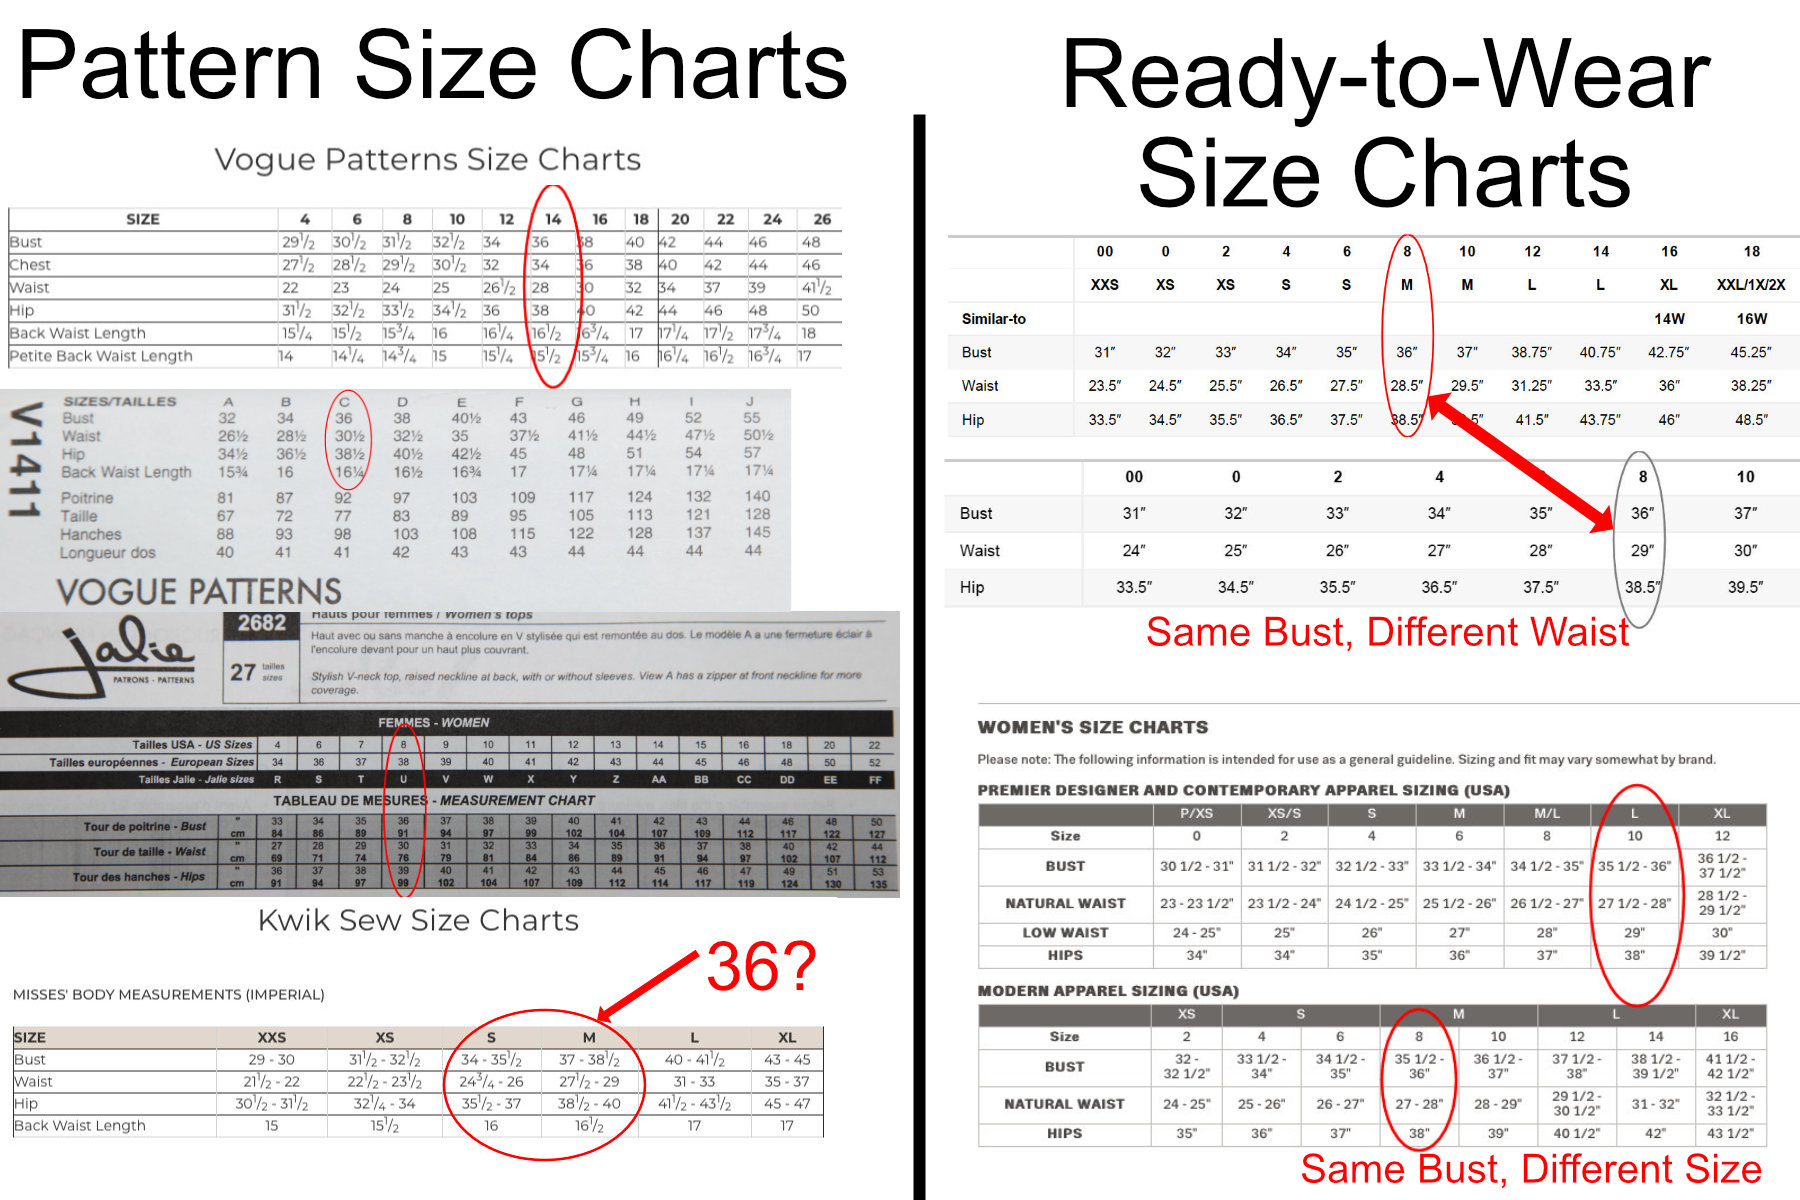
Several Pattern Size Charts Compared to “Ready-to-Wear” Size Charts
The key is to focus on measurements, not sizes. Take your measurements accurately (or better yet, have someone help you), and compare them to the pattern’s measurement chart. Remember, it’s easier to take in a garment that’s too big than to let out one that’s too small.
For shirts, typically you want to pick the size that corresponds with either your Bust or Chest. However, in some circumstances you may want to pick according to your waist if that gives you a bigger size. Though, not always, it’s easier to get things to fit in the shoudlers with the bust/chest measurement than if you go up a size to accommodate a larger waist. For pants or skirts, typically you would pick the size that corresponds with your hips. Especially if you are making elastic waist pants.
Most patterns include basic adjustment lines for length, and don’t be afraid to use them! Even simple adjustments like lengthening or shortening can make a huge difference in how your finished garment fits.
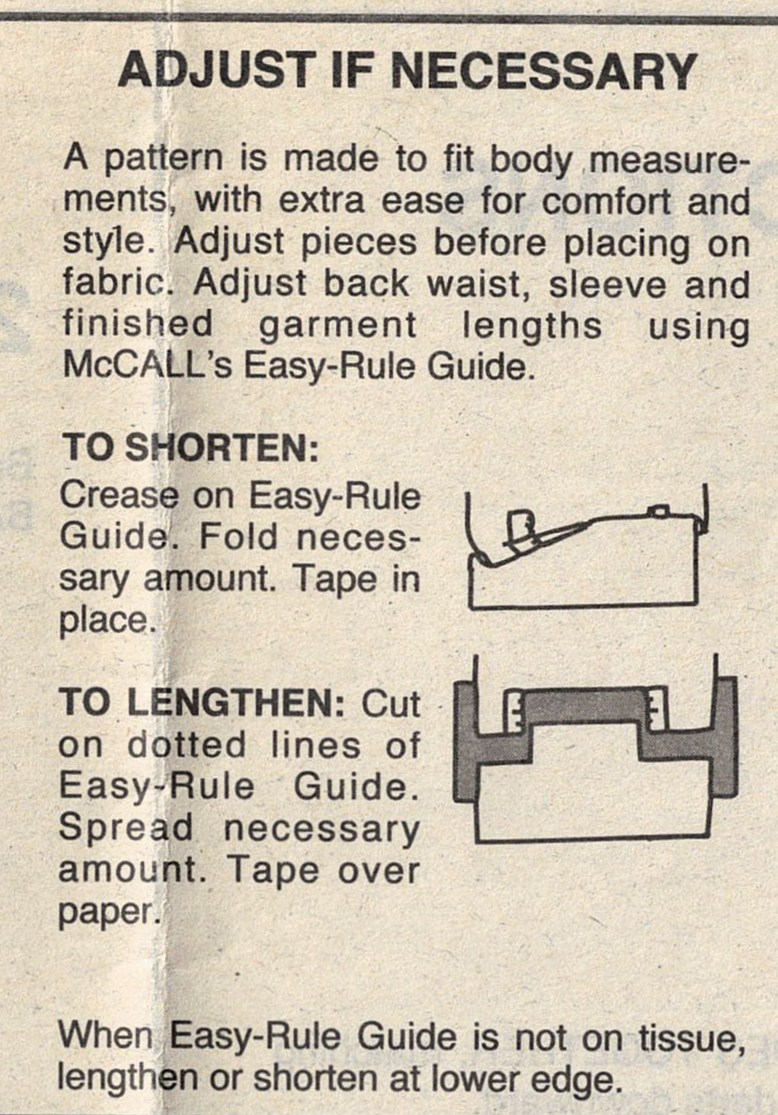
Generic Fit Adjustment Instructions
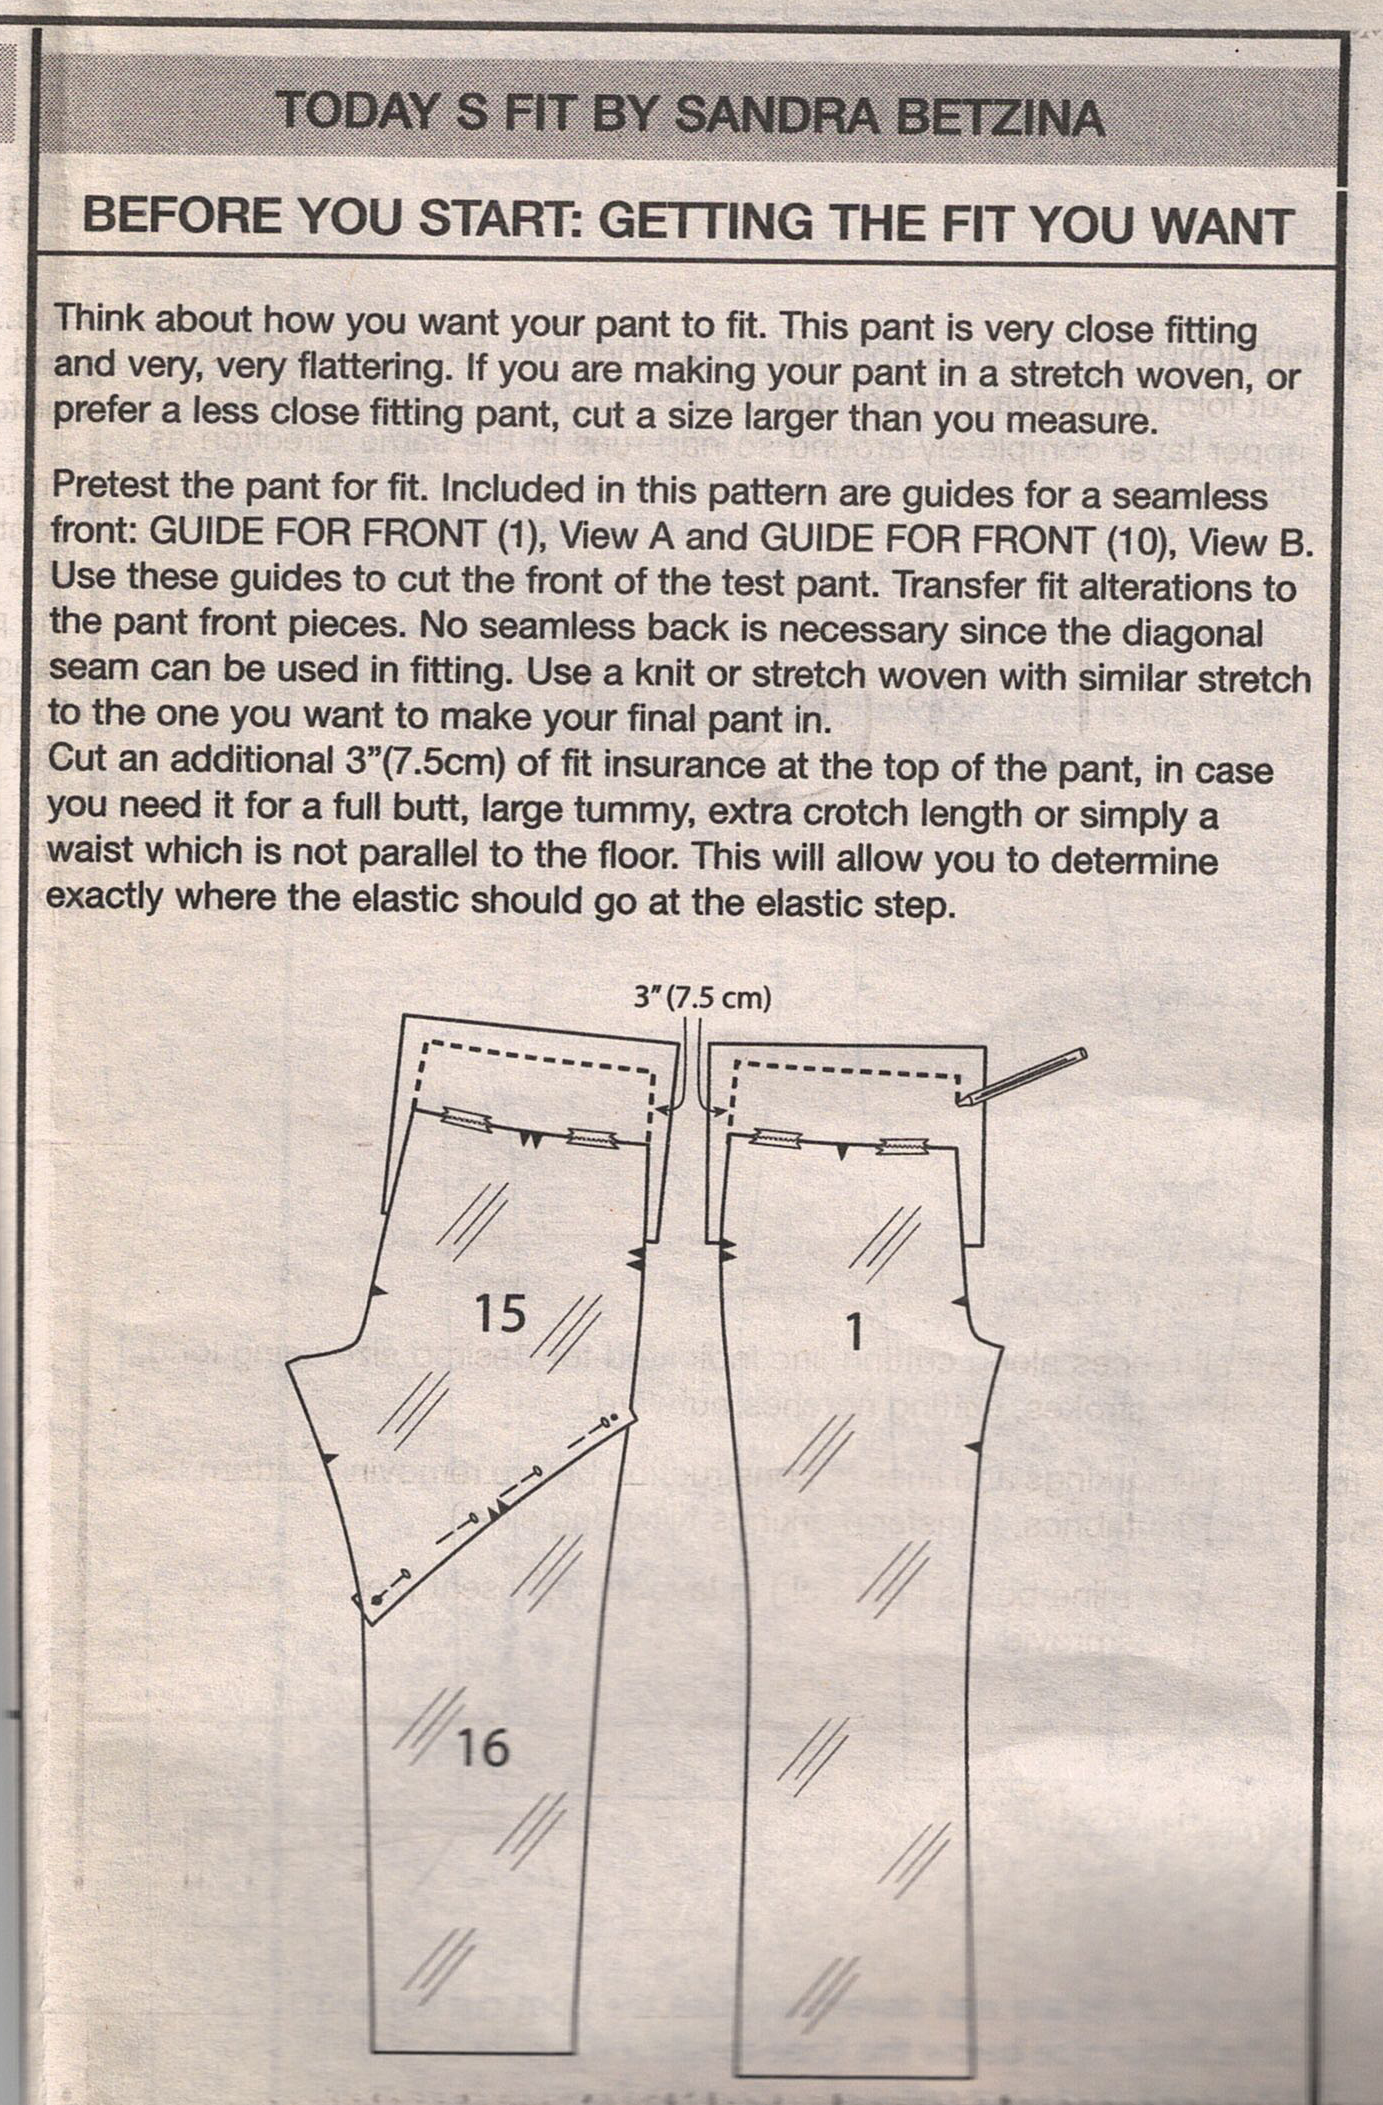
Fit Adjustment Instructions
Probably I should note that accessories like bags and housewares will have a finished size of the object. And they aren’t always as adjustable as clothing patterns.
Description and Line Drawings
Something that is probably overlooked and not well understood is the combination of the description and the line drawings. These two will tell you a LOT about the garment that the pattern is for.
Every pattern should have a line drawing. This is in addition to the photo or fashion sketch typically shown on the front of the envelope. Some patterns have the line drawing on the front, some have it on the back. The line drawing is more technical than a fashion sketch.
Typically, line drawings will show edge of pieces – either as seams or fold. They will also show seams that are for darts or pleats. These are typically solid lines. Line drawings also show stitch lines, like edge stitching or top stitching, as dashed lines.
And then there are lines I’m going to call style lines. And these aren’t necessarily seam lines, but they will be solid. They will indicate billowing of fabric like in a sleeve or pant leg or bunching at a gather or elastic band.
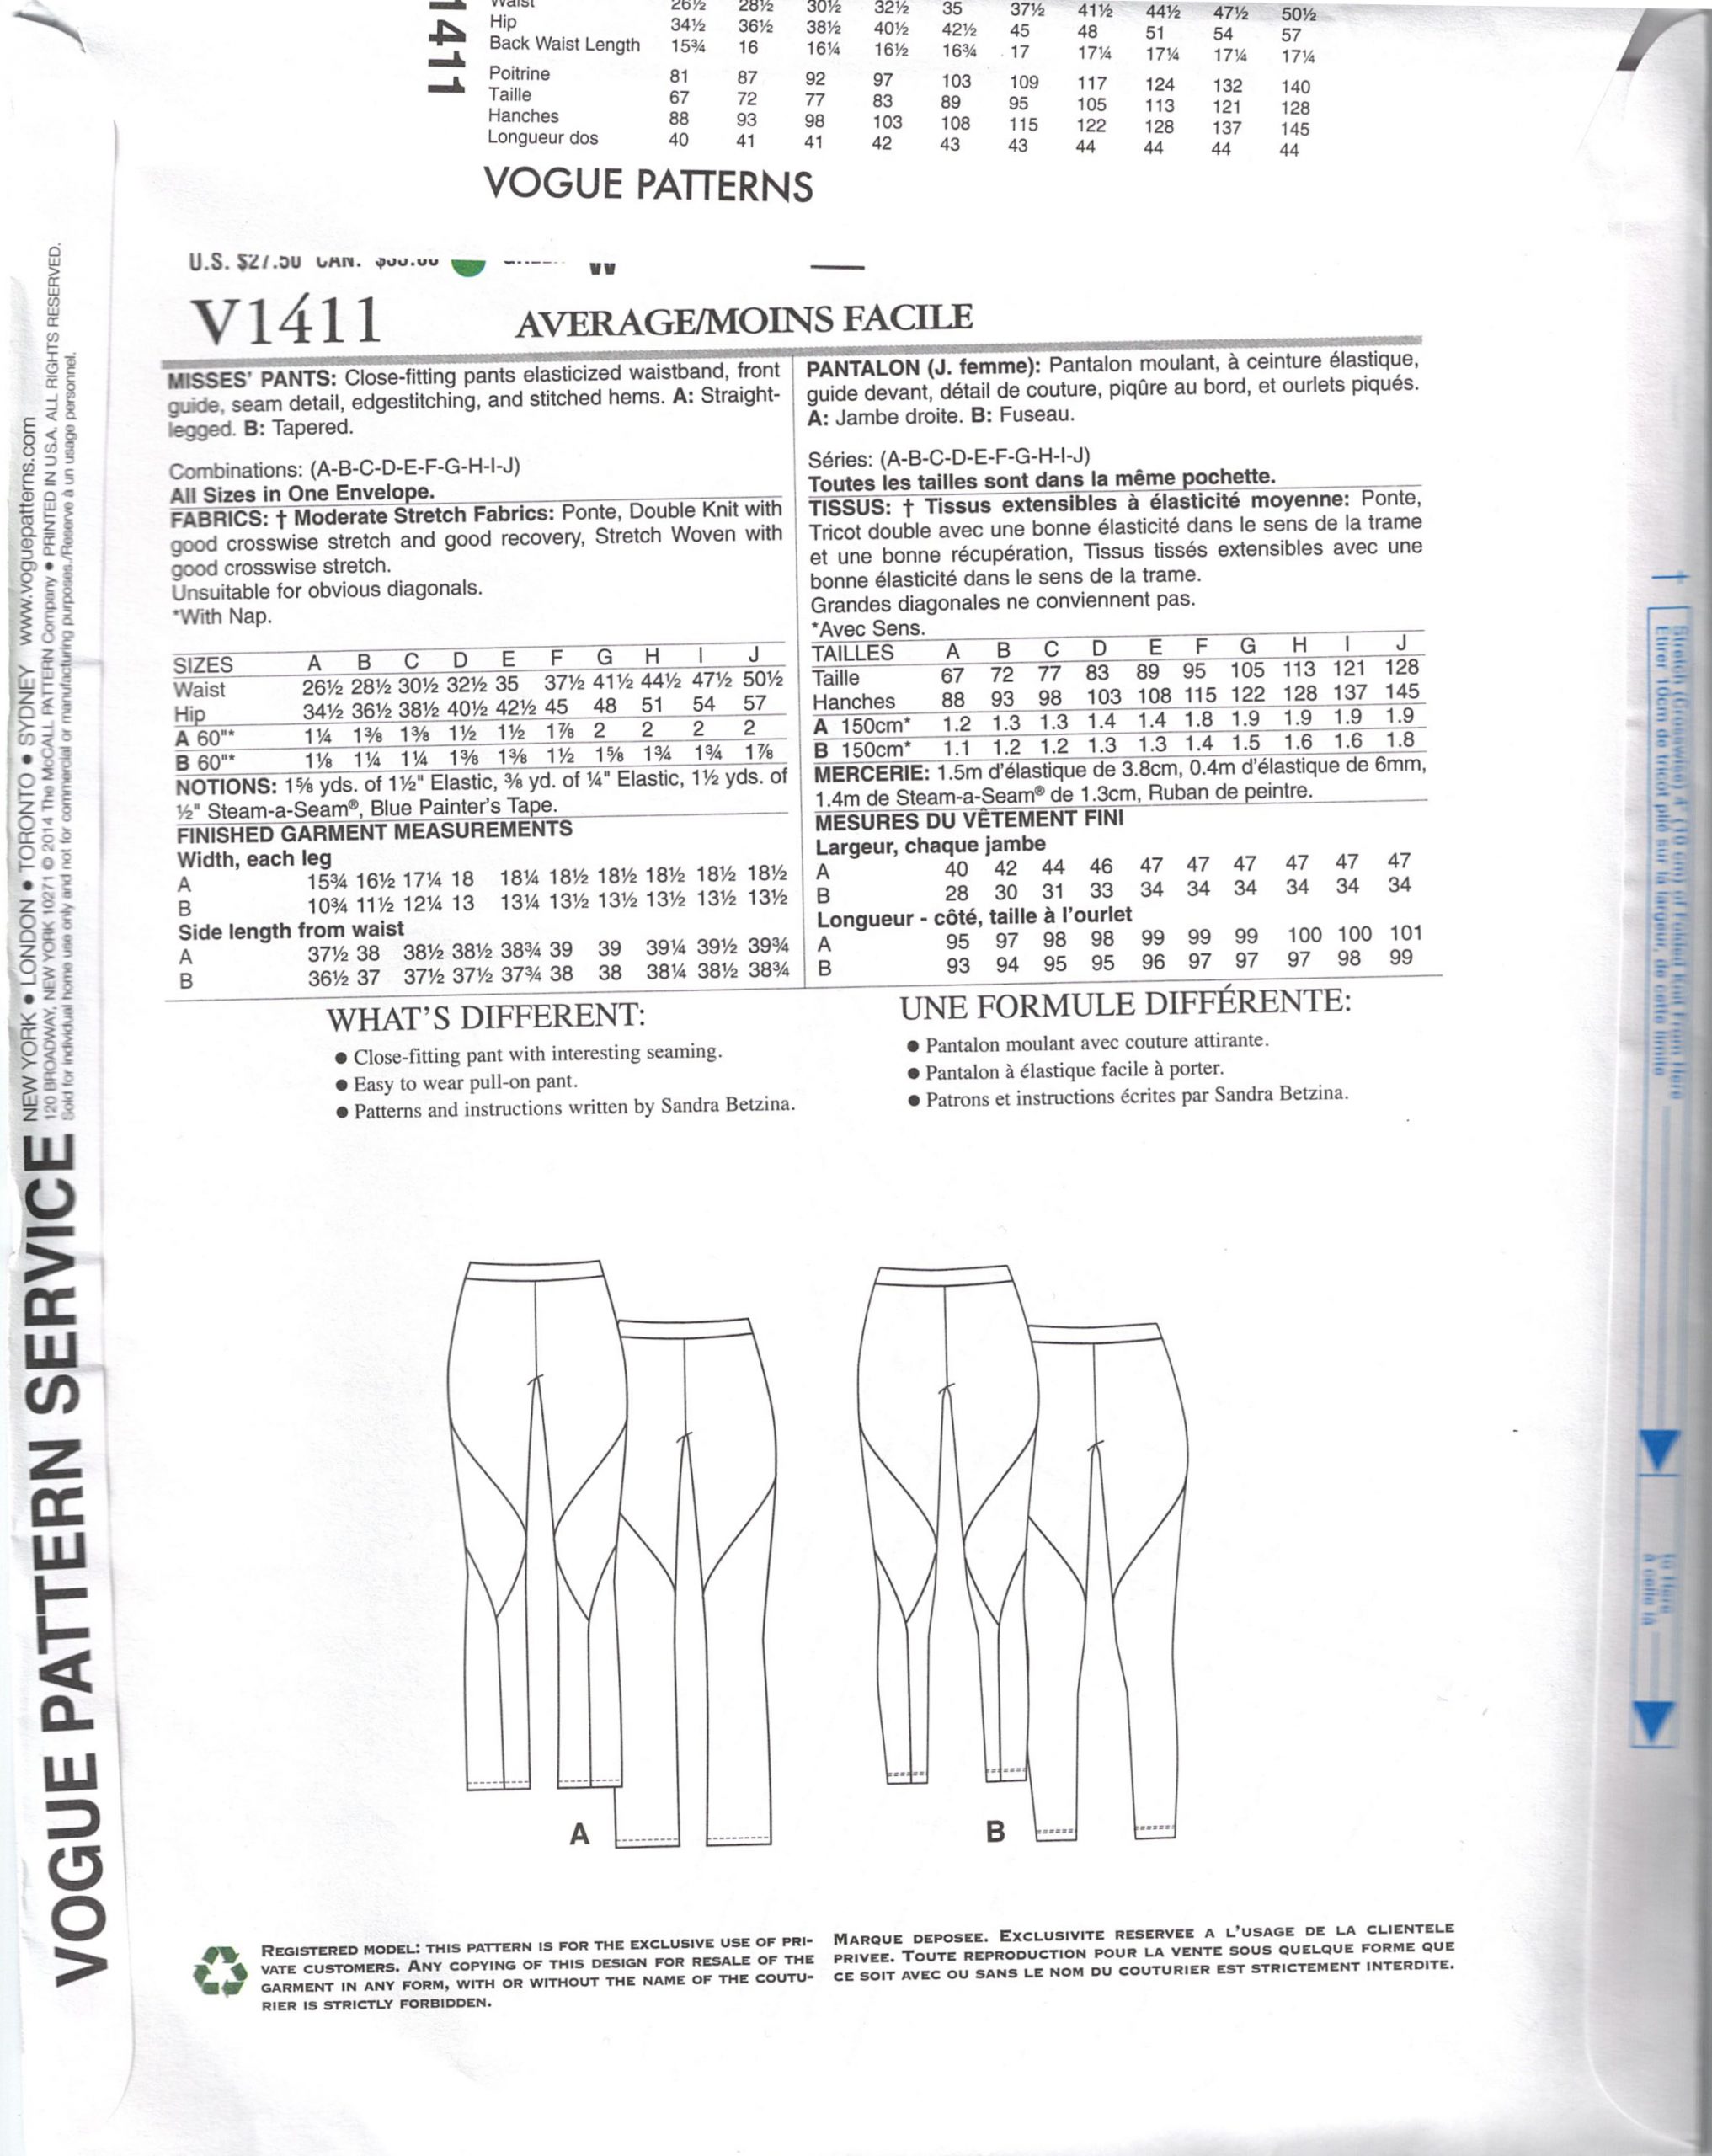
Line Drawing on Envelope Back at Bottom
Coupled with these drawing is a fairly generic yet thorough description of the garment. Here’s one example: “Loose-fitting shorts or pants have belt loops, fly front zipper, pleated front, side seam pockets, back welt pocket and wide leg.”
When choosing a pattern, it’s good to know how many pieces the thing you want to make has. And most patterns won’t actually call out the number of pieces. Though, some might.
It’s better to have a feel for what is within your comfort zone from descriptions and line art.
For example, fly front zippers, pleated fronts, and back welt pockets are more advanced techniques. Belt loops are relatively easy, but can get bulky and some machines struggle with them. But, if you just had your heart set on this pattern, you could make the pants without the back welt pocket, and skip the belt loops if you have a heavier weight fabric (or if you do a test run of multiple layers of your fabric and the machine struggles). But you’d still need to be comfortable enough to tackle the fly front zipper and pleats.
Another thing to note is if the model on the front is wearing pants and a top, and you want to make the pants and top, check the line drawing and description to make sure it includes both the top and pants. If the top is shown and described but the pants are not, then they are not in the pattern. Sometimes, you’ll find the same photo on the front of two different patterns. One for the tops, one for the bottoms. So know before you buy!
Working with Different Pattern Formats
If you’re working with PDF patterns, take your time with the printing and assembly. Make sure your printer is set to “actual size” or “100%” – no scaling! Most PDF patterns have a scale on one of the first pages to make sure your printer is printing at the scale needed. I like to print my PDF patterns on tracing paper – you don’t have to cut or fold to line the corner marks up.
Digital patterns often come with amazing features like layers so you turn off the sizes you don’t need and only print your size and maybe the size above or below if you want to blend between the two. They may also come with hyperlinked instructions or videos. Take advantage of these modern conveniences – they can make your sewing journey so much smoother!
Regardless what format you are using, if you have multi-size patterns, I recommend tracing the pattern in the size you want onto other paper. That way you aren’t cutting off sizes you might want to use in the future. It also helps preserve the delicate tissue paper that commercial patterns are printed on.
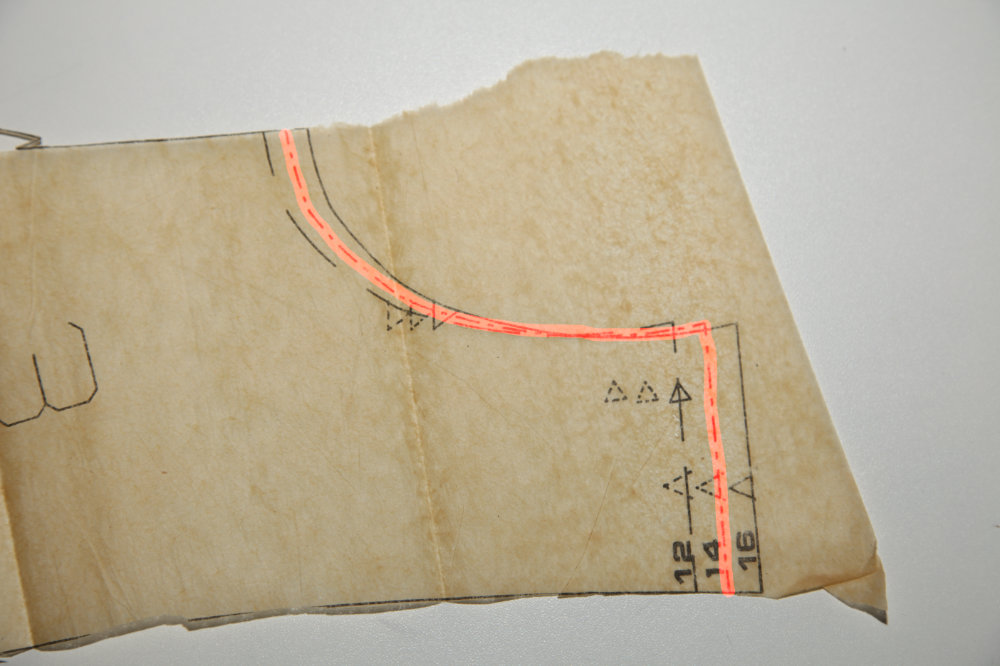
Highlighted Size that Overlaps Other Sizes
A word on the “delicate tissue paper”: It’s not that delicate. It does tear easily if mistreated, and it can crumple if not folded well. I always try to fold my tissue back in the way it was folded from the manufacture. Sometimes a little dry heat from the iron will make it flatten out.
For all your paper patterns, invest in a good storage solution. Large envelopes or file folders work great for printed or traced patterns. I use tote bins for my patterns and have divided them into categories like tops, bottoms, accessories. But ultimately you need to use what works for you. And that may change over time as your sewing evolves and your pattern stash grows. My sister repurposed an old dresser. The drawers were perfect for her stash. And she went a step further with making a binder with copies of all the pattern envelopes organized by garment and labeled for easy finding in her drawers.
Remember, patterns are an investment and it’s important to protect that investment.
I talk more about pattern storage in my courses that cover pattern drafting.
And you can find more information about reading commercial patterns here.
Ready for the Next Step?
Now that you have a better understanding of what to look for in a pattern, and all of the pattern requirements, it’s time for the really fun part – choosing your fabric! In the next section, we’ll dive into fabric selection, where I’ll help you navigate the wonderful world of textiles to find the perfect match for your pattern. Get ready to feel those fabrics! Ok, not really cause we’re on the internet.
